
1. IDE Setup
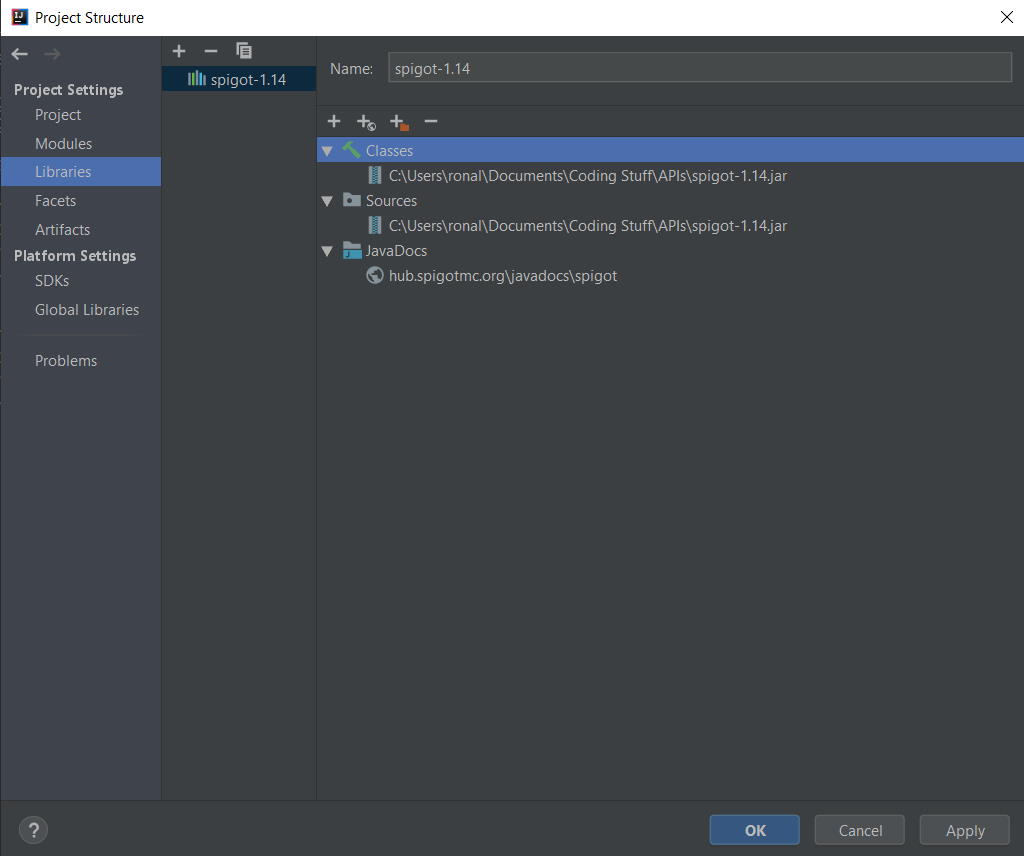
We're gonna be using IntelliJ IDEA as the IDE for this project. If you're using other IDEs like NetBeans or Eclipse and do not know how to replicate the process, you can ask our Discord community (or just search google)! Firstly, create a project. I'm naming mine MCPlugin. Next, visit getbukkit.org and download Spigot 1.14jar (at this time, this is the latest, most stable and updated Spigot library, so we'll be using this for the tutorial. If you wish to use any other version, go ahead, but different versions may have different formats and methods e.g. Player Inventory changes, new items, new entities). Then, in your project settings for the project you just created, add the jar file as a new library dependency. You can add the documentation url if you want (as of today, it is https://hub.spigotmc.org/javadocs/spigot). The documnetation url gives you a javadoc tooltip when you hover on Spigot library content, which we will use. Click apply and then OK to close the project settings window.
Now, we need to create the package within the src folder of the project. Usually, the package name's naming convention is a reversed website link. Different examples include org.mywebsitename.myname.projectname or com.myname.projectname. I'll creating a package with name me.thatonerr.mcplugin (ThatOneRR's my current in-game name I use). In that package, we need a Main class. People usually use names like Core, Main or the project name itself. I'll be using Main as the name of the main class (ba dum tsss!). The package and the main class are the 2 of 3 requirements for any plugins to work, the last one being the plugin.yml file. That's all for the project setup! I'll be touching on the Main class in the next part.
2. Main Classes
A Minecraft plugin is a .jar file (like the spigot library .jar, yes). When the Spigot server.jar
file
is
run, it looks for these .jar files in the plugins folder of the server and loads them, even if they
are
in
the wrong format (to run, the .jar file must at least have a package with a main class, as well as a
plugin.yml file, all with the right formats). A Main Class must extend the JavaPlugin class, and
each
plugin
will only have ONE JavaPlugin main class instance running at any point of time. That is
to
say,
there can only be one instance of each plugin running at a time. It would not make sense to run two
instances of your plugin at one time, will it?
So let's let our Main class extend the JavaPlugin class so that the server.jar knows that that is
the
class
to look for when it finds your plugin. Then, we need to override 2 methods from the JavaPlugin
class,
onEnable and onDisable. When the server.jar finds your plugin, then your main class extending the
JavaPlugin
class, it will run the onLoad, onEnable() and onDisable() methods. Therefore, we need to override
these
methods (we don't usually use onLoad because that is called before everything related to your plugin
is). As
the name suggests, onEnable() will be called when the server first starts, and onDisable() when the
server
is stopped. Everything you want your plugin to be done will usually be done within this two methods,
such as
registering events and commands.
Let's make this processes visual (to a certain extent) by sending console messages in the onEnable()
and
onDisable() methods with the handy method Bukkit.getLogger().info("Your text
here").
Bukkit.getLogger() gets the console and .info() shows the text to the console as an Info string. You
can
also do .warning() and .severe(), respectively, should the need arises.

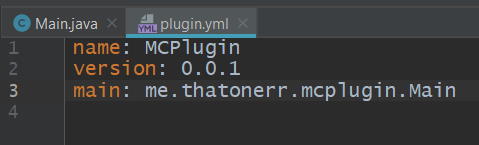
3. plugin.yml
When server.jar finds your .jar file, it looks for the plugin.yml and reads the fields there. The
compulsory
ones to write in order for your plugin to work are: Name, which registers your plugin name;
Main,
which
tells the server.jar where to look for your main class; and version, which is the version of your
plugin.
Right click on your src folder and create a new file called plugin.yml. Let's fill those blanks in,
shall
we?
4. Compiling/Finishing your plugin
In order to export your plugin into a .jar file, we need to tell IntelliJ how to compile it! There
is a
format to follow in a .jar file, and that is: the .jar file should contain the project package, the
plugin.yml and any other files or packages that you need to use. In this case, we just need the
project
package and the plugin.yml.
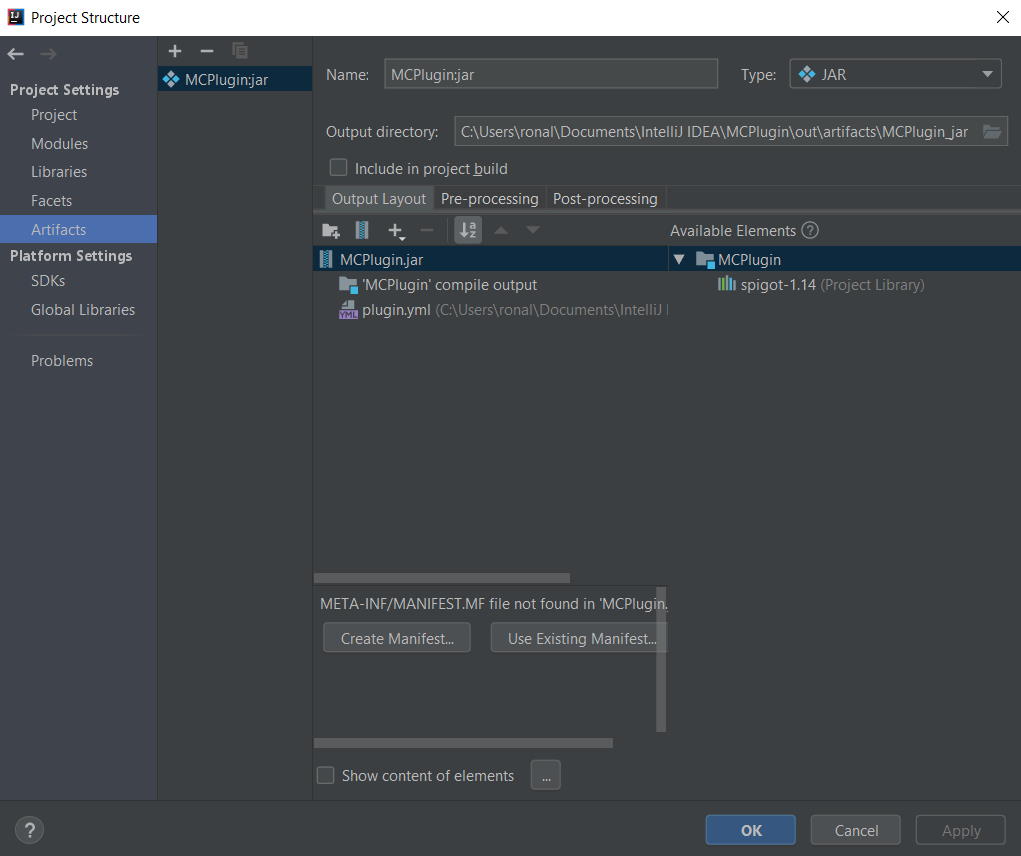
To do this, go into your project settings, click 'Artifacts', the 'Add (+) button', JAR, From
modules
with
dependencies, then "Ok".
The settings for that module should then show up on the right. Then, removed the "Extrated
spigot-1.13.2.jar" part - We don't need the entire library compiled into our plugin; the library
used is
the
server.jar. Then click add within the module, select 'File', find and select your plugin.yml file.
Click
apply and OK to close the window.
Now all you need to do is hover over 'Build' in the toolbar at the top of the window, click 'Build
Artifacts' and then 'Build'.
5. Setting up a Spigot server
For those of you who already know how to set up a Spigot server or use a server host, good for you!
You
ca
skip this part if you want. But for those of you who are unsure how to set up your Spigot server,
here's
how. We'll be using a localhost server, meaning the server is going to set up on your computer, and
using
your network!
Remember the spigot jar you downloaded? Create a folder and drop a copy in, rename it to server.jar,
then
create a text file and open it. Type in "java -jar server.jar" (without the quotes) and save it as
run.bat
(you can specify arguments if you want to control runtime parameters like memory allocation). Run it
to
allow it to generate the eula file the first time. Then accept the eula.txt by change "eula=false"
to
"eula=true" and run the jar file again. This time, it should generate all the necessary files, like
world
folders, temp folders, server files and the plugin folder. If you're using cracked Minecraft, change
the
option "online-mode" to true in the server-properties file.
See that plugin folder? Double click it to enter it and drop a copy of your build artifact found in
your
project file's out > artifacts folder into there. Then, restart your server by closing and
re-opening
run.bat.
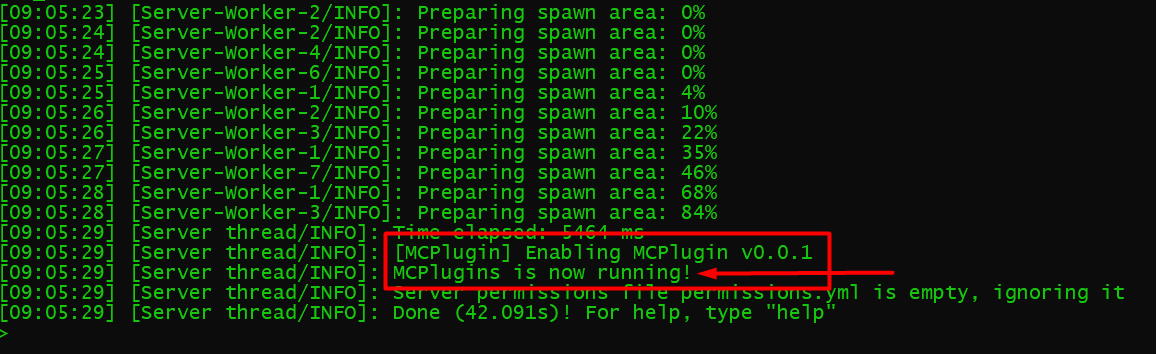
See the output in the console? That means the code in the onEnable() is executed! You can turn off the server by executing the command "/stop" (without the quotes), and you'll see the onDisable() console message we coded in too!