1. Introduction
Properly creating your custom command requires 3 parts: Specifying it in your plugin.yml, building a CommandExecutor class and registering it with Spigot's plugin manager. When a command that is not native to vanilla Minecraft is sent, an event is fired and Spigot picks it up. It then proceeds to check whether the entered string (without the '/' in front, duh) matches any of the given commands registered in its plugin manager. If it does not match any entries, then it returns an unknown command message. If it does find a matching entry, it passes the details to the respective CommandExecutor class and allows it to execute its protocols. That's precisely what we are going to do.
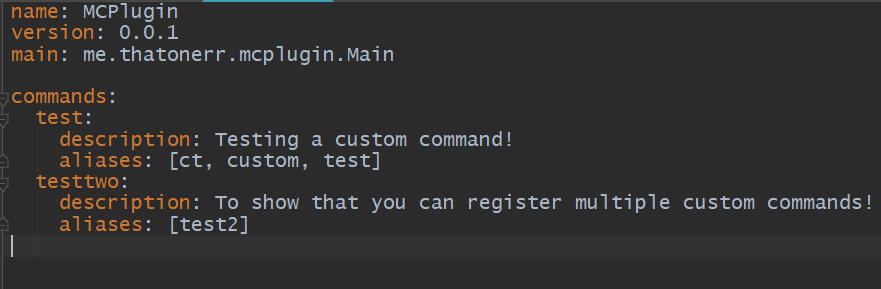
2. plugin.yml
First things first, let's update our plugin.yml. Many a times have i gotten too excited in creating
custom
commands that i always forget to do this step, and then the plugin never executes the command. Then
I'd
spend hours figuring out what is wrong with my plugin structure before realising this stupid mistake
that
I've made. Yes, if you do not specify your custom commands in your plugin.yml, your custom
command
will not get executed!
To complete this, just add a new attribute "command" that accepts a list of your custom commands.
Next, type
in your custom command name under that command attribute, and all is well! Programmers usually
specify the
and the aliases as well. Aliases refer to the alternate strings you can enter (like
how
/message can be /msg, /emsg etc.).
3. CommandExecutor
The CommandExecutor class is an interface provided by the Spigot API to allow you to control what
happens
when a (custom) command gets executed. Of course, you can always use the CommandReprocessEvent event
to
listen for any commands at all, even if it is already registered, and then do your code there if it
matches,
but that is highly inefficient and looks very ugly when there are multiple commands. Besides, that
is the
improper way (though there are times when it is necessary) of catching commands, and we should
utilise the
Spigot library's methods that are provided to us. So let's get started, shall we?
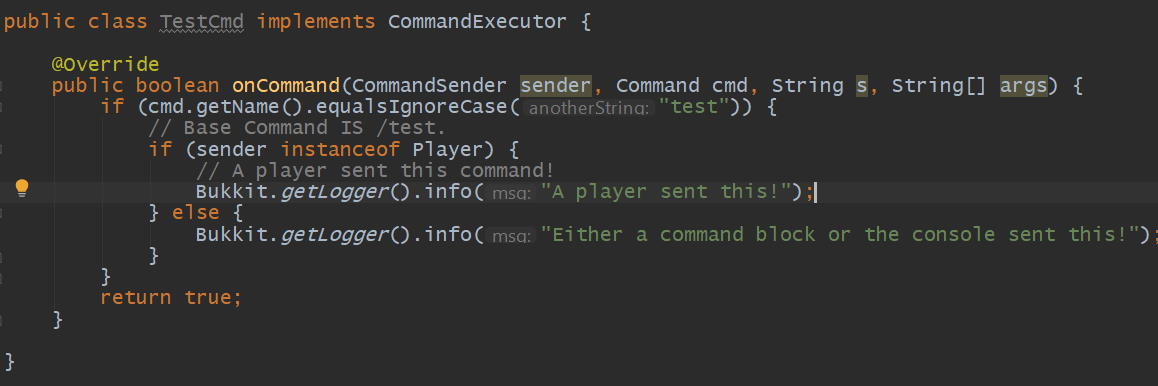
First, create a new class and make it implement the class CommandExecutor, I'm calling mine TestCmd.
Right
off the bat, you'll find that IntelliJ IDEA shows an error, and that is because CommandExecutor
requires the
subclass to override the onCommand() method in the interface. The onCommand() class is what Spigot's
plugin
registry will call when a user executes a custom command that you have properly registered, allowing
you to
run your code. In addition, it has 4 parameters provided, the CommandSender
(Player,
Console, Command Block etc), Command (stores command information of executed
command),
Alias string (the string entered, either in alias or main form) and finally the
Argument strings (the arguments entered following the command, like /cmd arg1 arg2
arg3
etc). Usually, we won't touch the alias string as we use Command.getName() for the command instead.
Following that, you'll find that the method returns a boolean. Most of the time (and I usually mean
99% of
the time), you'll want to replace the default 'return false' to 'return true'. The boolean return
determines
whether the command executed will be completed (i.e 'return false' will render the command useless,
and
'return true' to work). We usually make it return true even if there are errors like wrong command
format or
wrong input type, and handle those errors on our own (e.g. Sending a text saying it's the wrong
format).
This is all very dry, but bear with me, we're moving on to the fun part. Now we can start work on
playing
with the commands. Firstly, we will need to check if the entered command is what we are looking for
(in this
case, the command "/test"). We do that by comparing the CommandSender.getName() with the desired
command,
without the '/'. It is better to use the string equivalent operator
string.equalsIgnoreCase() so that it ignores the case. Take note that we do not use
the
alias string as we want to compare the base, or main form, of the command. Next, we'll need to check
who is
sending the command, with the CommandSender object and the
instanceof
operation. I'll send the console different messages depending on who sent the command. Alright,
next!
4. Registering with plugin
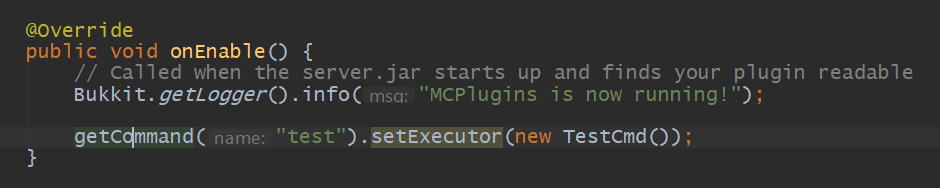
Now, we need to register the CommandExecutor with our plugin, so our plugin tells Spigot that we have a custom command executor and requests to parse the command. To do this, we use the getCommand("test").setExecutor(new TestCmd()) statement. What this does is that it gets the command called "test" from the plugin.yml and assigns a CommandExecutor to it. This step is usually the simplest and fastest, so let's breeze through it! It should go in the onEnable() method when the plugin starts up.
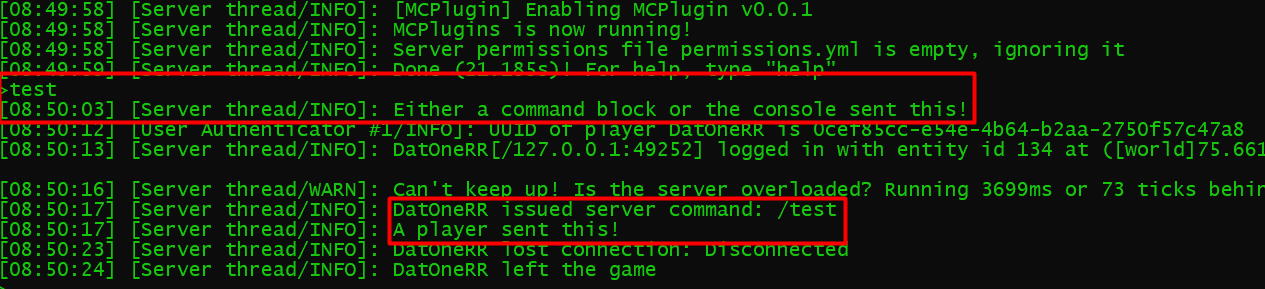
Now let's compile our plugin and look at the output when the console and the player sends the command!